




Dark circles are the one thing concealer is most often bought for, and the one thing it most often fails at. Not because concealers are bad, but because the skin under the eyes breaks every rule that works on the rest of the face: it is thinner, drier, more mobile, and the darkness underneath it is a colour problem as much as a coverage problem. Put a thick, pale concealer on top and you get the classic result — grey, cakey, creased by lunchtime, and somehow more obvious than the circles you started with.
I have made all of those mistakes, and the fix was never a more expensive concealer. It was choosing the right shade for the colour underneath, picking a formula that suits thin skin, prepping properly, and using far less product than I thought I needed. This guide walks through each of those decisions in order, so you can stop buying concealers that disappoint you and start getting the one you already own to behave.
1. Work out what colour your dark circles actually are
Before you look at a single shade, look at your circles in daylight, with no makeup on. Dark circles are not all the same colour, and the shade that fixes one type will make another look worse.
Blue or purple circles are the most common. They come from thin skin showing the blood vessels underneath, and they get worse with tiredness, thin skin and genetics. They need a warm corrector first — peach for fair to light skin, salmon or orange for medium to deep skin — because warm tones cancel blue and purple. A plain skin-coloured concealer on top of a blue circle just mixes into grey.
Brown or olive-toned circles are more about pigmentation than vessels, and they respond better to a concealer that matches your skin tone closely, sometimes with a slightly warm or golden undertone, rather than a corrector. Greenish circles are rarer and usually need a pink-toned corrector. If you are not sure which you have, hold a peach corrector and a plain concealer next to the circle: the one that makes the darkness disappear instead of turning it grey is the right family.
This is also the point where honesty helps. No concealer erases a structural shadow — the hollow under the eye that comes from bone structure or volume loss will still catch light differently, and piling product into it only draws attention to the texture. Concealer fixes colour. It does not rebuild the area, and expecting it to is how people end up with a thick, creased layer that looks worse than the circle.
2. Prep the under-eye first, or the concealer will not sit properly
Concealer creases most often because the skin underneath it is dry or because product was layered over skincare that had not set. The under-eye area has almost no oil glands of its own, so it dries out faster than the rest of the face, and dry skin grabs concealer unevenly and cracks it as you move your face.
Use a light eye cream, not a heavy one. A pea-sized amount for both eyes, patted in with your ring finger, then wait a full minute before anything else goes on top. Heavy eye creams are the hidden cause of a lot of creasing: they leave a slippery film that concealer slides on, and by midday the product has migrated into every fine line. If your eye cream feels greasy after a minute, you used too much — blot the excess off with a tissue rather than adding more product on top of it.

Sunscreen matters here too, and it needs the same patience. If you wear sunscreen under makeup, let it set for a few minutes before concealer — a damp sunscreen base is one of the fastest ways to make under-eye concealer pill and slide. The order that works for me is the one in my foundation guide: skincare, sunscreen left to set, then makeup, thinnest layers first. The under-eye area is the least forgiving place to rush that sequence, so give it the extra minute.
3. Colour corrector or concealer — and when you need both
A corrector and a concealer are not the same product, and knowing which one you need saves both money and disappointment. A corrector uses opposite colours to cancel darkness: peach cancels blue, pink cancels green, yellow cancels purple. A concealer matches your skin tone and covers what is left after the colour is neutralised.
If your circles are mild — visible but not strongly coloured — a well-matched concealer on its own is usually enough, and adding a corrector underneath just adds a layer that can crease. If your circles are strongly blue or purple, a concealer alone will almost always turn grey, and that is when a corrector earns its place: a thin layer of peach or salmon, blended out, then a skin-toned concealer over the top. The corrector does the colour work so the concealer does not have to be thick, and thin layers are the whole secret to not creasing.
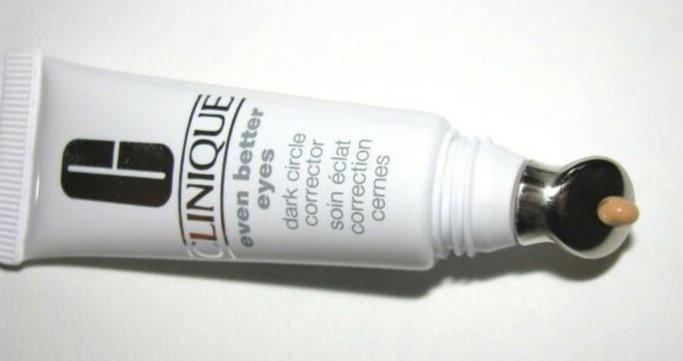
The Clinique dark circle corrector review on this site covers a product built exactly for this step: a corrector with a cooling applicator that targets the discolouration itself rather than trying to cover it with opacity. It is the clearest example I have of the principle — fix the colour first, and the concealer layer on top can stay thin.
4. Picking the right shade
Shade is where most concealer purchases go wrong, and the usual advice — "go one or two shades lighter than your foundation" — is only half true. It works if your goal is brightening, and it fails if you go too light, because a concealer that is much lighter than your skin reads as a pale patch under the eye, especially in daylight and in photos.
The rule that has worked best for me: for dark circles, pick a concealer one shade lighter than your foundation at most, and in a warm or peachy undertone rather than a cool or pink one. Warmth counteracts the blue in the circle; lightness brightens. If you need more brightening than one shade lighter gives you, add a tiny amount of a lighter shade only at the inner corner, where shadows are deepest, rather than lightening the whole under-eye area.
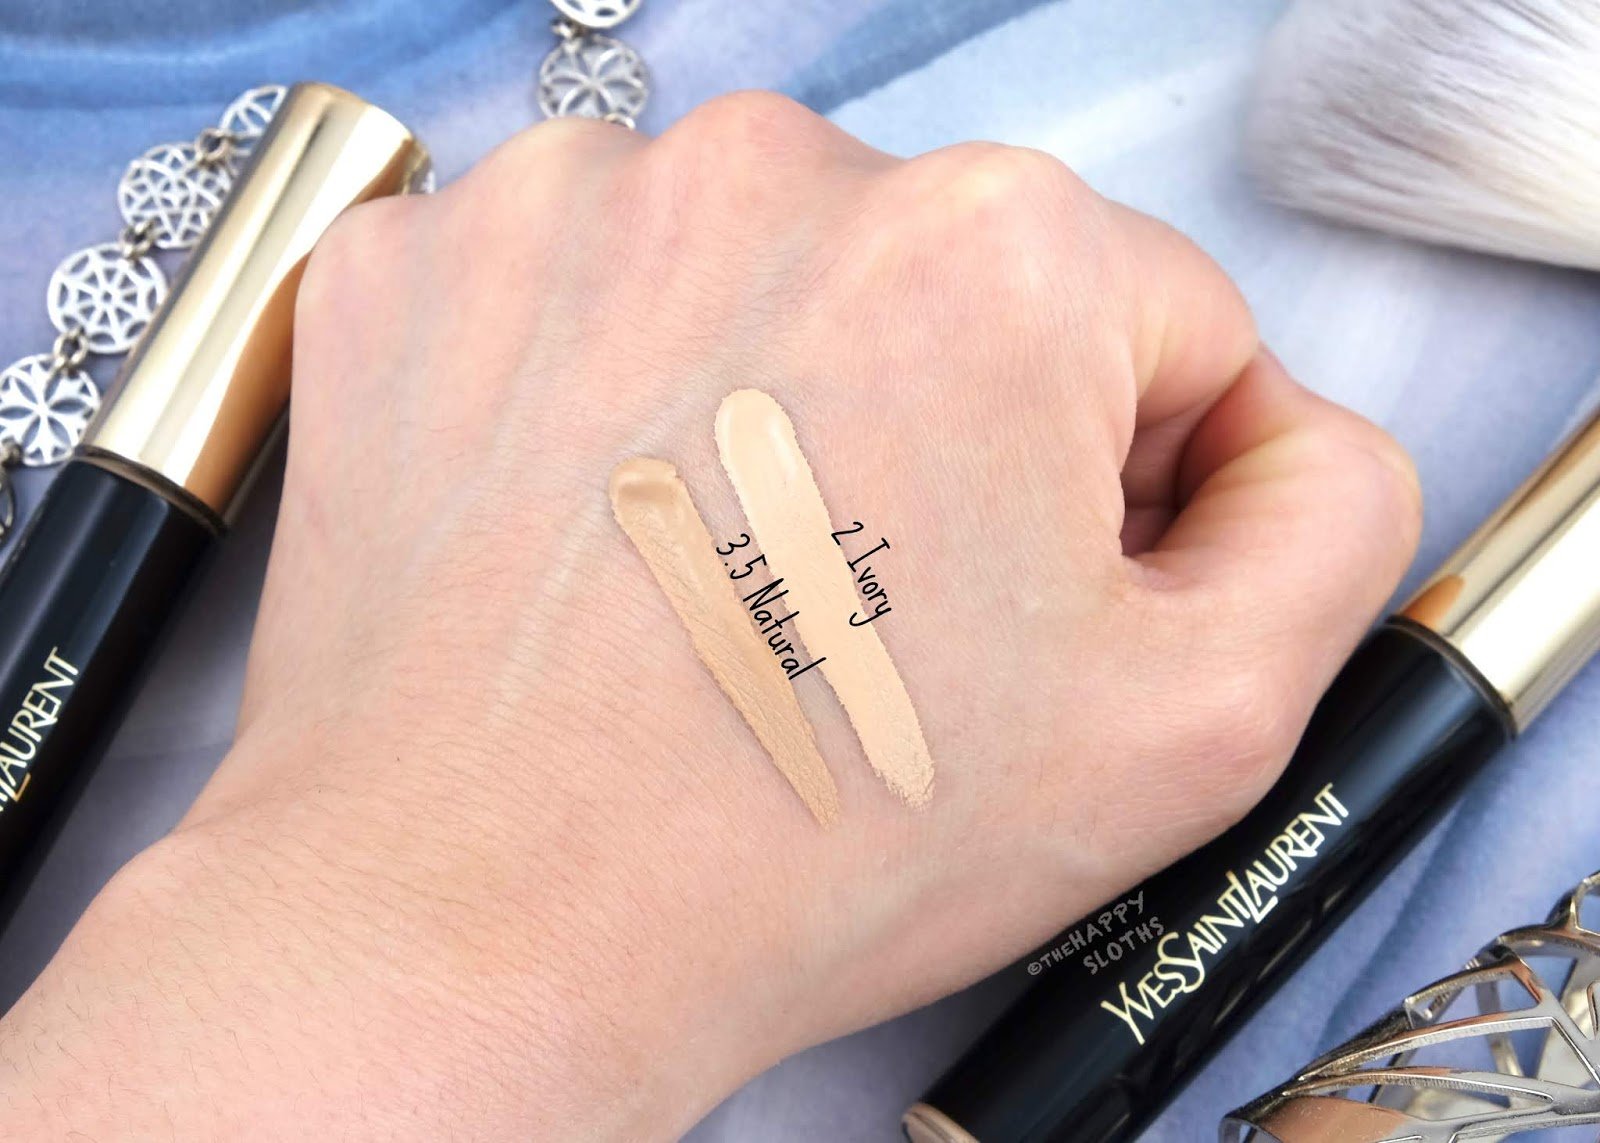
Swatch before you buy, and swatch on the back of your hand in daylight, not under shop lighting. Two shades that look identical under store lights can be a full shade apart in daylight. The YSL All Hours concealer review on this site shows what useful swatching looks like — two shades side by side on skin, so you can see the undertone difference rather than guessing from the tube. That is the comparison to make before you spend money: same light, same skin, two shades, and pick the one that disappears into your skin instead of sitting on top of it.
Undertone matters more than depth for dark circles. If your circles are blue-purple, a peachy or salmon undertone will do more than a lighter shade will. If your skin is deep, do not reach for a pale concealer to brighten — it will look ashy. A rich, warm shade that matches your skin, over a salmon corrector, brightens without the grey cast. And if you are between shades, go with the one that matches your foundation rather than the lighter one; you can always add a touch of brightness, but you cannot un-do a concealer that is too pale without starting over.
5. Formula: what works under the eyes, and what does not
The under-eye area punishes the wrong formula faster than anywhere else on the face. What to look for, and what to avoid:
- Liquid concealers are the safest default for dark circles. They
spread thin, blend easily, and sit comfortably on thin skin. Most of the concealers I have reviewed here are liquids for exactly this reason. The Hourglass Vanish concealer review is a good example of the type: a liquid that gives real coverage from a small amount, which is the combination that matters — coverage per drop, not coverage per thick layer.
- Cream concealers in pots or compacts give more coverage, but they
are also the most likely to crease, because they are thicker and drier. They can work if you warm a tiny amount on the back of your hand first and press it on thinly, but they are a poor first choice for crease-prone under-eyes.
- Stick concealers are convenient but often too dry and waxy for
the under-eye area, and they drag on application. They suit spot concealing on the rest of the face better than dark circles.
- Brightening or illuminating concealers — the pen-style ones with
a brush tip — are not concealers in the coverage sense. The YSL Touche Éclat concealer review on this site explains the distinction well: it brightens and reflects light, which is wonderful over a real concealer, but on its own it will not cover a strong dark circle. Think of it as the finishing step, not the coverage step.
Finish matters too. A matte concealer on dry under-eyes will emphasise every fine line by midday. A dewy or satin finish is more forgiving, and if you have oily skin, the answer is not a drier concealer — it is a thinner layer, set properly, which brings me to the application itself.
6. How to apply it so it does not crease
Application is where good concealers are ruined and average ones are saved. The method matters more than the product.
Start with less than you think you need. One small dot at the inner corner, one at the outer corner, and one in the middle of the darkest area is enough for most people. Dot, do not swipe — swiping drags product into lines and deposits too much in one place. Blend with a damp sponge or your warm ring finger, pressing rather than rubbing, and blend the edges out so there is no visible line where the concealer stops.
Then wait. This is the step everyone skips, and it is the one that prevents creasing more than any product choice. Let the concealer sit for thirty seconds to a minute before you set it or layer anything over it. It settles into the skin, the excess that would have creased gets absorbed or can be tapped away, and what is left is the thin, even layer you actually want. If you set it immediately, you lock in the excess too.
Check for creases before you set, not after. Look in a mirror, smile, and see where the product has gathered. Tap those lines out gently with a clean finger or a sponge — do not add more product. Only when the under-eye looks smooth should you set it, because powder locks in whatever is there, creases included.
7. Setting it without drying it out
Setting is necessary — unset concealer migrates — but over-powdering is the other classic way to ruin under-eye makeup. A heavy powder layer dries the area out, emphasises texture, and by afternoon looks worse than no powder at all.
Use a small, fluffy brush and the smallest amount of translucent powder, pressed — not swept — only where the concealer actually sits. Tap the brush to remove excess before it touches your face. The goal is a whisper of powder, not a visible layer. If you can see powder, you used too much.
A setting spray is the better finishing step for the under-eye area, and it is the reason I keep coming back to the routine in my setting-spray guide: powder lightly, then mist over the top to melt the powder into the skin and take away the dry look. Used that way, the spray is not just holding makeup in place — it is fixing the powdery finish that makes concealer look obvious. The same light hand applies: one or two mists from a distance, not a close-range soak.
8. Mistakes that make dark circles look worse
A short list of the ones I see most often, including my own:
- Too much product. The single biggest cause of creasing. If your
concealer creases, use half as much before you blame the formula.
- Too light a shade. Pale concealer over a dark circle turns grey
and draws the eye straight to the area. Warmth fixes colour; lightness alone does not.
- Skipping prep. Concealer on dry, unprepped skin catches and
cracks. One minute with eye cream changes the result more than a new concealer will.
- Setting immediately. Powder locks in creases. Wait, tap them out,
then set.
- Powdering heavily. A visible powder layer under the eye ages the
area by years. Less is more, and a mist finish helps.
- Using foundation as concealer. Foundation is sheerer and less
pigmented than concealer, so you need more of it to cover a circle — and more product means more creasing. Use the right product for the job; my foundation guide covers getting foundation itself to last, but it is not a substitute for concealer under the eyes.
- Expecting erasure. Concealer improves dark circles; it does not
delete them. A realistic expectation — softer, brighter, less noticeable — is what a good result actually looks like.
FAQ
What shade of concealer should I use for dark circles? One shade lighter than your foundation at most, in a warm or peachy undertone. If your circles are strongly blue or purple, use a peach or salmon colour corrector first, then a skin-toned concealer over the top — warmth cancels the blue, and the concealer layer can stay thin.
Why does my concealer always crease under my eyes? Usually too much product, no wait time before setting, or dry unprepped skin. Use less, let it sit for thirty seconds, tap out any lines before you powder, and set with the lightest possible touch of powder.
Should I use a colour corrector before concealer? Only if your circles are strongly coloured. Mild circles usually need just a well-matched concealer. Strong blue or purple circles turn grey under concealer alone, and that is when a thin peach or salmon corrector underneath earns its place.
Is a brightening concealer the same as a regular concealer? No. Brightening pens reflect light and add glow, but they do not give real coverage on their own. Use a proper concealer for coverage first, then a brightening product on top if you want extra light at the inner corner.
Can I use the same concealer for dark circles and blemishes? You can, but the jobs are different: dark circles need warmth and a thin, flexible layer, while blemishes need opacity and grip. One liquid concealer can do both if the shade matches, but a shade that is right for your under-eyes is often too light or too warm for a blemish.
How do I stop concealer looking dry under my eyes? Prep with a light eye cream, use a satin or dewy formula rather than a matte one, apply thinly, and finish with a light mist of setting spray over a whisper of powder instead of a heavy powder layer.
Do I put concealer on before or after foundation? After foundation, for dark circles. Foundation evens the rest of the face first, so you can see how much darkness is actually left — usually less than you thought — and use less concealer. The exception is a colour corrector, which goes on before foundation.
The short version
Dark circles are a colour problem first and a coverage problem second. Find out whether yours are blue-purple, brown or greenish, cancel the colour with a warm corrector if they are strong, then use a thin layer of a liquid concealer one shade lighter than your foundation, in a warm undertone. Prep with a light eye cream, let each layer settle, tap out creases before you set, and powder with the lightest possible hand. The concealer you already own probably works — it is the shade, the amount and the order that decide whether it creases or not.